How to Use Self Adhesive Laminating Sheets for Printables
This post may contain affiliate links. Please read my disclosure for more info.
If you’re looking for a quick way to laminate all of your favorite organizational printables, I love and recommend self-adhesive laminating sheets!
Here are a few reasons why:
- They can be used anywhere without the use of a machine.
- They are easy to use and safe for all ages, so kids can use these too for their own projects.
- They require very little storage space.
- You don’t need any special supplies (other than your markers).
- The sheets come in a variety of sizes and can be easily trimmed down.
With these handy sheets, you can turn ANY ordinary printable into one that you can use over and over again.
How to use self laminating sheets for printables
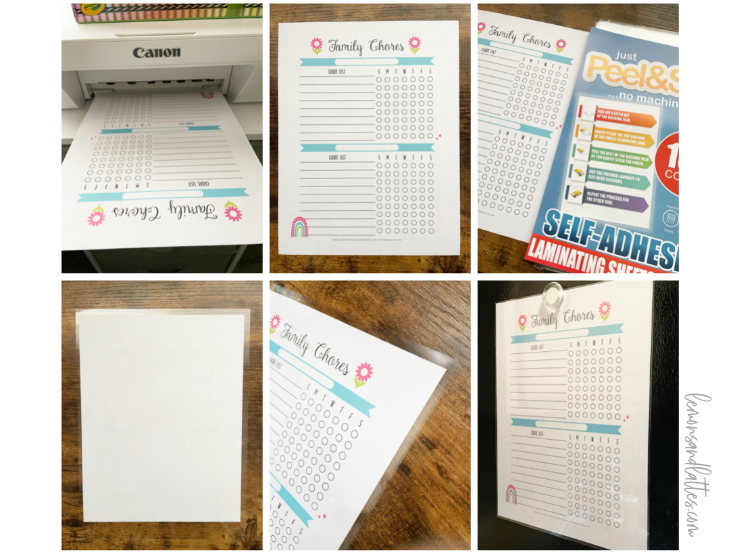
For the purposes of this step-by-step, I’m going to walk you through the entire process of laminating without a laminator – using a family chores template. If you like this chart, you can grab the same one for free!
You’ll need:
- Your printable of choice
- 2 laminating sheets (if yours are single sheets)
- A credit card or ruler for smoothing out any bubbles
- Scissors for trimming the edges once you’re done
1. Start with a fresh printout.
I recommend starting with a fresh printout because it ensures you won’t have any wrinkles in the paper or bent edges.
Some people prefer to trim their printable, but that’s totally up to you!
2. Peel off the plastic film from sheet #1 and place the printable facedown.
It doesn’t matter whether you place it face up or down. This is just how I prefer to do it.
3. Peel off the plastic from sheet #2 and place it sticky side down.
You do want to make sure the edges line up, but it doesn’t have to be perfect because, remember, we will be trimming the edges once everything is nice and pressed together.
4. Smooth our any air bubbles you see.
I have not had have a problem with air bubbles. They usually smooth right out by using the edge of your hand.
But, if you do find a stubborn one, a credit card or ruler should do the trick.
5. Trim the edges.
You do have to tread carefully with the trimming. You need to leave enough of a thin border so that the edges stay pressed together, especially if you are printing on thicker paper.
If you trim too much, the laminating sheets won’t stay together!
Display your finished product on the fridge, keep one in your desk, or place it wherever else you’d like!
But do they work?
The short answer is yes, they do work.
Here’s an example of the brain dump template I laminated:
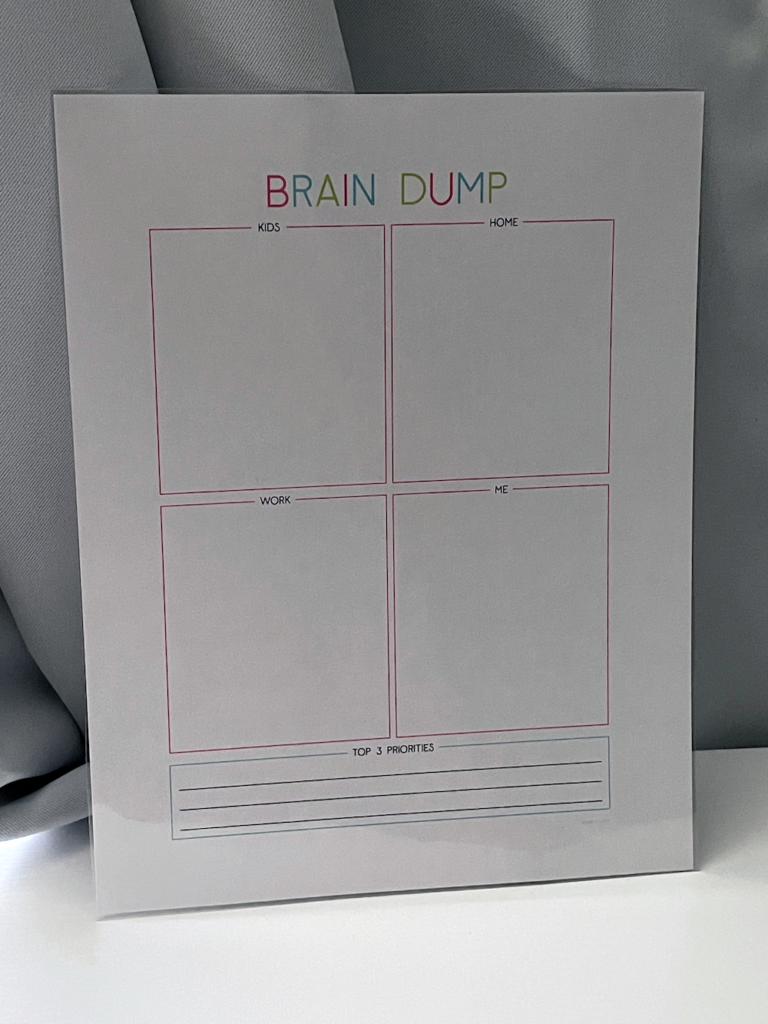
Like traditional laminating, self-laminating sheets are made of a plastic material that protects your printouts (and other documents) from wear and tear, dirt, water, and spills.
And, you can also write on this material, which eliminates the need to print a new copy each time you want to use a certain printable.
So, you will definitely save some ink! Which is great, because ink isn’t cheap.
They’re also incredibly easy to use. All you need is some scissors and an object for smoothing out the bubbles (much like you would when applying a screen protector to your iPhone).
The best part about these sheets is you don’t need any special machines to use them. Since each sheet has a sticky, adhesive side, all you have to do is peel and stick and then smooth out any bubbles you see.
What are the best laminating sheets?
If you’re looking for a brand-specific recommendation, the Avery Self-Adhesive Laminating Sheets are a popular choice, especially if you are impressed by products that are PVC-free.
But, any peel-and-stick laminating sheets will work.
I personally purchased these a few months ago because they came with 100 in a pack, but as long as you choose sheets with good reviews, you should be fine.
While shopping, there are a couple of things to pay attention to.
First – What size are the sheets?
You can always trim down the edges, but you can’t size up. You don’t want to buy sheets that are too small for your printable.
These come in all sorts of sizes.
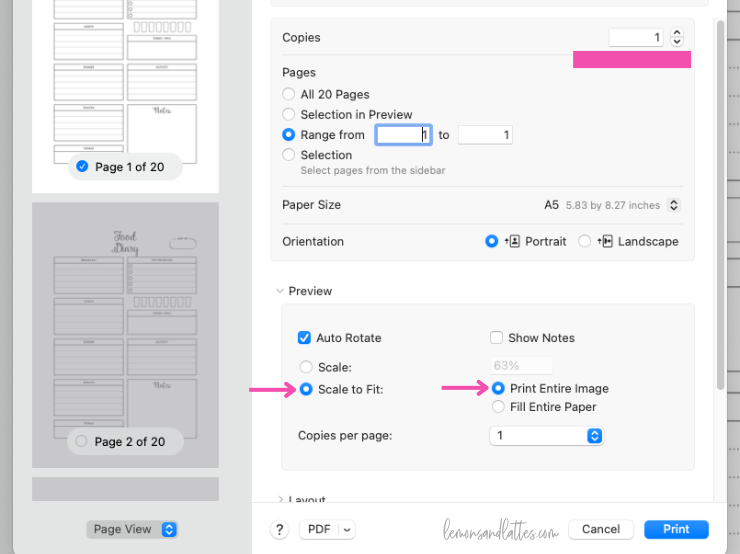
By the way, it’s very simple to resize your printable PDF if you find that you need a different size.
Also – Are they single sheets or pouches?
If you choose a product that is packaged with single sheets, you will need two of them to laminate one page, so that’s something to keep in mind.
As you’re shopping, you may also notice that some products say “self-laminating pouches” instead of sheets.
There actually is a difference.
The pouches may not be quite as durable as the sheets since it’s common for them to have adhesive that only goes around the edges.
The sheets, on the other hand, typically have adhesive that covers the an entire side of one sheet.
What types of printables are best for laminating?
While you probably won’t want to laminate every single PDF you print out, the ones you find yourself sticking on the fridge or using frequently are perfect candidates.
Here’s a list of some of the most common organizational printables that people tend to laminate:
- Weekly meal planner for the fridge
- Monthly calendars
- Workout calendar
- Recipe cards
- Chore charts
- School worksheets for kids
- Checklists and to-do lists
- Morning or evening routine
However, they are great to have around the house for any type of worksheet or document you want to protect.
For example, sometimes insurance cards, for whatever reason, won’t be a nice plastic card – They may be printed on paper instead. You can use a laminating sheet to protect them and make them last longer.
Another example, if you’re a parent, is homework practice. You can use laminating sheets to turn any worksheet into a reusable learning tool.
That way, your kids can practice their numbers, letters, handwriting, etc. without having to print heaps and heaps of worksheets.
What are the best dry-erase markers for laminated paper?
When you are marker shopping for laminated paper, there are a couple things to keep in mind with this as well.
First, the marker tip. A fine-point tip typically works better for laminated printables since you are writing on a much smaller surface than a large dry erase board.
Next, the type of marker. Your average dry-erase marker will write on templates that have been laminated with self-adhesive sheets, but will they write well? Maybe.
If you want to ensure that your writing stays on the board and doesn’t smudge easily, then you may want to invest in a few wet erase markers instead.
The EXPO Vis-à-Vis Wet Erase Markers are perfect for writing on laminated sheets and other non-porous surfaces, and they have that fine point we’re looking for.
This variety pack includes black, blue, red, green, yellow, purple, orange, and brown.
What other supplies do I need?
There’s no need to buy a special eraser for cleaning your laminated printables. A damp cloth or paper towel is all that’s needed.
If you will be sticking your new sheet on the fridge, you may want to consider a magnetic clip or magnets that have an adhesive side, but any magnet you already have at home will work.
Whether you’re a student, teacher, parent, or just someone who loves to organize their lives with printables, self-laminating sheets are an easy and affordable way to create reusable dry-erase versions of your favorite templates!